
ESP8266 + NEO Pixel

Recently I was impressed by NeoPixel RGB LEDs and LED stripes. The main advantages of this LEDs are:
- you can control color using only a single pin of your micro-controller (ordinary RGB LEDs are controlled using 3 pins because they are 3 LEDs of each color in one package)
- you can chain LEDs in stripes (or buy manufactured stripe) and address each led individually.
Working with this LEDs for newbies especially using 3.3v micro controllers could be not very straightforward and I’d like to share my experience here.
I’ve ordered several single LEDs and 50 cm stripe.
I’ve ordered them on AliExpress it is much cheaper than Amazon but normally the cheapest delivery takes 2 weeks – 1 month.
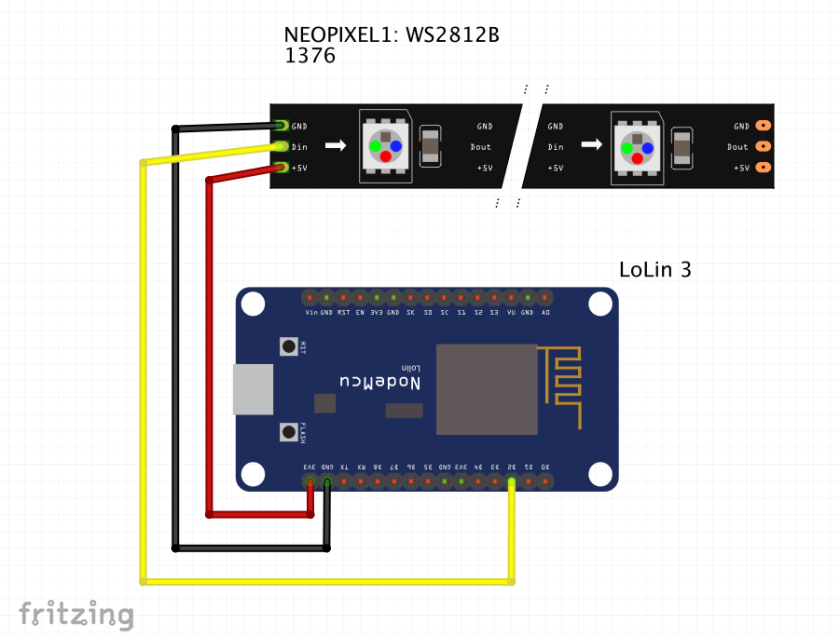
WS2812B LED strip
Be aware of stripe naming – name describes LEDs quantity per 1 meter. E.g. “ws2812 30 pixels 5050 rgb” will mean 30 pixels in 1 meter if you order 0.5m you will get 15 LEDs.
It’s quite easy to connect it to 5v or 3.3v micro-controllers. According to marks on the stripe it expects 5v VCC, but if you wan’t to connect it with 3.3v based micro-controllers, e.g. ESP8266 based, just connect VCC to 3.3v (not to 5v!), even if you have 5v pin on your board. In 3.3v micro controllers our digital output pins using 3.3v level and it should much to your LED strip VCC. Otherwise you need to use additional signal shifter which converts 3.3v to 5.0v. If your 3.3v based micro controller converts 5v (from USB) to 3.3v I don’t think it supports long LEDs stripes due to high current required for long LED stripe and probably you will need to think of 3.3v -> 5v logical pins shifter. In my case stripe with 7 pixels works ok.

I’d recommend you to use PlatformIO + FastLED library. For me the below config works ok.
FastLED.addLeds<WS2812B, BULB, RGB>(ledsStripe, FAST_LED_LEDS_NUM);
WS2811 LEDs![]()
Working with single LEDs is a bit more tricky.
- First ensure which version have you ordered (WS2811, APA106, P9823). WS2811 pinout differs from APA106 and P9823, so you can easily fire up your LEDs (as I did). LEDs are not symmetric, one side doesn’t have bevel + pins lengths also differs.
- Always connect LEDs DIN to your micro controller using resistance 200-500 ohm. Some people says that some led’s has embedded resistor and your need no more that 50 ohm here, but it wasn’t my case. I just fired up several LEDs due to lack of resistor. In LEDs stripe resistor is embedded and visible on stripe between LEDs that is why we didn’t use it in previous section.
- Use 3.3 VCC for 3.3v micro controller (e.g. ESP8266) and 5v with 5v micro controllers (UNO, Pro Micro, …)


You can also chain this LEDs in stripe. I’m not sure about proper resistor so I will not you recommend any specific for chaining. In feedback for WS2811 on aliexpress (see links in the beginning) people show working chains without intermediate resistors but better find somewhere additional information. I have a few working LEDs left and don’t want to experiment with wiring at the moment.
As in the previous section I’d advise you PlatformIO + FastLED library.
FastLED.addLeds<WS2811, BULB, RGB>(ledsStripe, FAST_LED_LEDS_NUM);
Code Sample
See below a minimal code sample using PlatformIO tool chain. Extended example is available at https://github.com/iromeo/iot_esp8266_neopixel.
platformio.ini
[env:d1_mini]
platform = espressif8266
board = d1_mini
framework = arduino
; Serial Monitor options
monitor_speed = 115200

lib_deps =
    FastLED
src/main.cpp
#include <Arduino.h>
#include <FastLED.h>

#define FAST_LED_LEDS_NUM 1

// GPIO4 = D2
#define NEO_PIXEL_DIN 4

CRGB ledsStripe[FAST_LED_LEDS_NUM];
void setStripeColor(uint8_t amount_red, uint8_t amount_green, uint8_t amount_blue);

void setup(void) {
  Serial.begin(115200);

  Serial.println(F("Configuring LED strip..."));

  //FastLED.addLeds<WS2812B, NEO_PIXEL_DIN, GRB>(ledsStripe, FAST_LED_LEDS_NUM);
  FastLED.addLeds<WS2811, NEO_PIXEL_DIN, GRB>(ledsStripe, FAST_LED_LEDS_NUM);

  setStripeColor(0, 0, 0);
  FastLED.show();

  pinMode(LED_BUILTIN, OUTPUT);
  Serial.println("Starting...");
}

void loop(void) {
  digitalWrite(LED_BUILTIN, 1 - digitalRead(LED_BUILTIN));
  setStripeColor(255, 0, 0);
  FastLED.show();
  delay(1000);
  setStripeColor(0, 255, 0);
  FastLED.show();
  delay(1000);
  setStripeColor(0, 0, 255);
  FastLED.show();
  delay(1000);
}

void setStripeColor(uint8_t amount_red, uint8_t amount_green, uint8_t amount_blue) {
  for (int i = 0; i < FAST_LED_LEDS_NUM; i++) {
    // actually red on our led is on "green" channel
    ledsStripe[i].g = amount_red;
    ledsStripe[i].r = amount_green;
    ledsStripe[i].b = amount_blue;
  }
}
Arquitecto especialista en gestion de proyectos si necesitas desarrollar algun proyecto en Bogota contactame en el 3006825874 o visita mi pagina en www.arquitectobogota.tk
0 comentarios:
Publicar un comentario